从零开始:使用 OpenTelemetry Collector 构建强大的日志处理流水线
在 上篇文章 中,我们通过基于 Kubernetes 注解的 OpenTelemetry 动态发现为应用添加了日志采集的能力。从 OpenTelemetry Collector 日志我们可以看到为两个示例应用创建了 FileLog 接收器 来采集日志。
在本文中,我们将深入探索 OpenTelemetry Collector 的 FileLog 日志接收器的使用。
前文回顾
首先回看下上篇文章的结尾,Otel 的 Kubernetes Observer 发现了带有指定注解或者符合接收器创建规则的 Pod,自动为其创建了 FileLog 接收器。
我们将日志中 Reciver Creator 通过内置配置模板创建的接收器,转换为 OpenTelemetry Collector 配置文件:
config:
  receivers:
    filelog:
      include:
        - "/var/log/pods/default_java-sample-77b6d8f9c5-5zzh5_e6c5ca2a-6c3f-4ae4-89a6-34ca5cd9a3fa/java-sample/*.log"
      include_file_name: false
      include_file_path: true
      operators:
        - id: container-parser
          type: container
在这个配置中,我们指定了 filelog 接收器的配置:
include:指定了要采集的日志文件,这里是java-sample应用的日志文件。路径/var/log/pods/<namespace>_<pod_name>_<pod_uid>/<restart_count>.log是 Kubernetes 默认的日志路径。include_file_name:是否包含文件名,默认为true。include_file_path:是否包含文件路径,默认为false。operators:日志处理流水线,可以使用多个处理器对日志进行流式处理。这里使用了类型为container处理器,用于解析容器日志。
除了上面的几个配置外,FileLog 接收器还支持 更多的配置,方便对日志采集进行灵活的定制。
Container Opeartor 是用于容器日志的处理器。它支持以下功能:
- Docker、Containered 和 CRI-O 日志格式的解析。
- 从日志文件路径中提取容器元数据,比如容器名、容器 ID、命名空间、Pod 名等。
- 支持多行日志的合并。
简单的几行配置就可以实现容器日志的采集。
Container Operator 是在 v0.101.0 版本中引入的,其大大简化了日志采集的配置。而在之前,用于容器日志采集的配置非常复杂的。
正好通过这个例子深入探索一下 FileLog 的核心特性 - 日志处理流水线。
日志处理流水线
在 FileLog 接收器中,流水线是一系列 处理器 Operator 的组合。每个处理器都可以执行简单的操作,比如解析、过滤、转换、聚合等。所以流水线,就是将这些处理器按照一定的顺序组合在一起,形成一个处理链,是日志从读取到输出的整个处理过程。
每个处理器:
- 有一个唯一的 ID。
- 有一个类型,用于标识处理器的功能。
- 可以有配置,用于指定处理器的行为。
- 从上一个处理器接收日志,处理后输出到下一个处理器。
- 处理器的处理顺序是按照定义的顺序从上到下执行,但可以通过
out字段指定输出到下一个处理器。
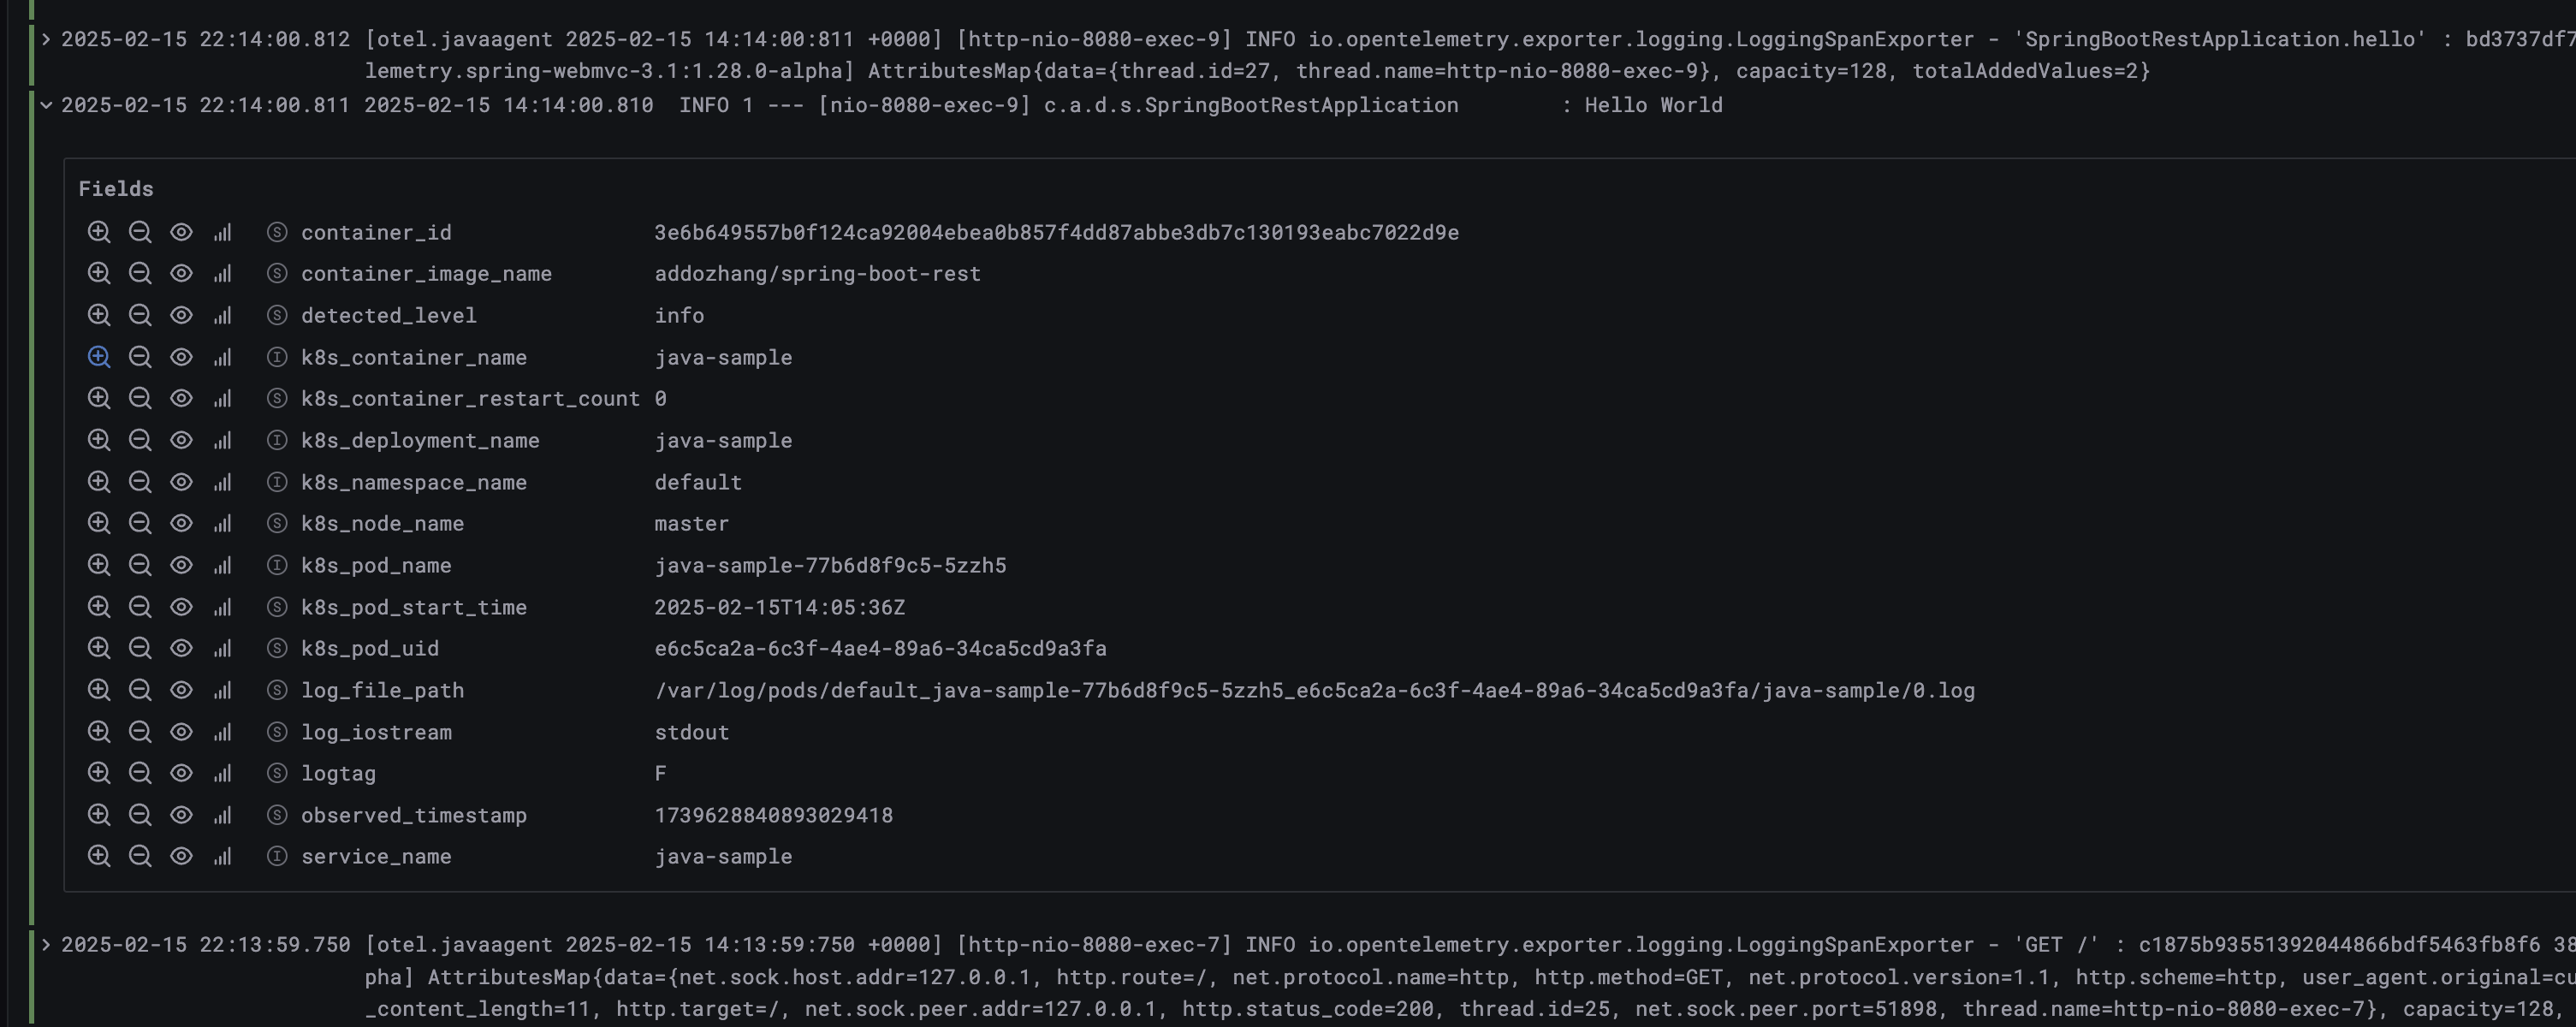
从日志文件中找出上图中展示的那条日志。
2025-02-15T14:14:00.811085588Z stdout F 2025-02-15 14:14:00.810 INFO 1 --- [nio-8080-exec-9] c.a.d.s.SpringBootRestApplication : Hello World
这是一条来自 Containerd 容器的日志,包含了如下几个部分:
- 时间戳:
2025-02-15T14:14:00.811085588Z,这是容器运行时记录日志的时间。 - 日志来源:
stdout,表示日志是从容器的标准输出(Standard Output)流中捕获的。 - 日志格式类型:
F,这里是日志格式类型。F(Full)表示完整的日志记录;P(Partial)表示日志是分段记录的一部分,通常用于处理超长日志行。。 - 应用日志:这部分是应用程序本身记录的日志,包含了时间、日志级别、线程信息、类名、日志消息等。
让我们通过 FileLog 接收器的配置来解析这条日志,这套配置将实现 Container Operator 的全部功能。
配置示例
基础配置
首先在 Otel Operator 的配置中添加 FileLog 接收器的基础配置。
config:
  receivers:
    filelog:
      include:
      - "/var/log/pods/*/*/*.log"
      exclude:
      - "/var/log/pods/otel-collector*/*/*.log"
      start_at: end
      poll_interval: 300ms
      encoding: utf-8
      include_file_name: false
      include_file_path: true
      preserve_trailing_whitespaces: true
      preserve_leading_whitespaces: false
      operators:
        -
其中包含了 FileLog 接收器的基础配置:
include:指定了要采集的日志文件,这里是所有容器的日志文件。exclude:排除了一些不需要采集的日志文件,比如 Otel Collector 的日志文件。start_at:指定了日志采集的起始位置,这里是从日志文件的末尾开始采集。poll_interval:指定了日志文件的轮询间隔,这里是 300ms。encoding:指定了日志文件的编码格式,这里是 UTF-8。include_file_name:是否包含文件名,默认为true。include_file_path:是否包含文件路径,默认为false。preserve_trailing_whitespaces:是否保留行尾空格,默认为true。preserve_leading_whitespaces:是否保留行首空格,默认为false。operators:日志处理流水线。
接下来就是配置的核心,日志处理流水线。
流水线:容器日志解析
第一个处理器 parser-containerd,用于解析 Containerd 容器的日志。如果需要解析其他容器的日志,可以添加多个同类型的处理器,使用匹配的正则表达式。
- id: parser-containerd
  type: regex_parser
  regex: ^(?P<time>\S+Z)\s(?P<stream>stdout|stderr)\s(?P<logtag>[^ ]*)\s?(?P<log>.*)
  output: containerd-recombine
这里使用了 regex_parser 类型的处理器,用于解析正则表达式匹配的日志。该表达式将日志分为时间 time、日志来源 stream、日志格式类型 logtag、日志内容 log 等几个部分。
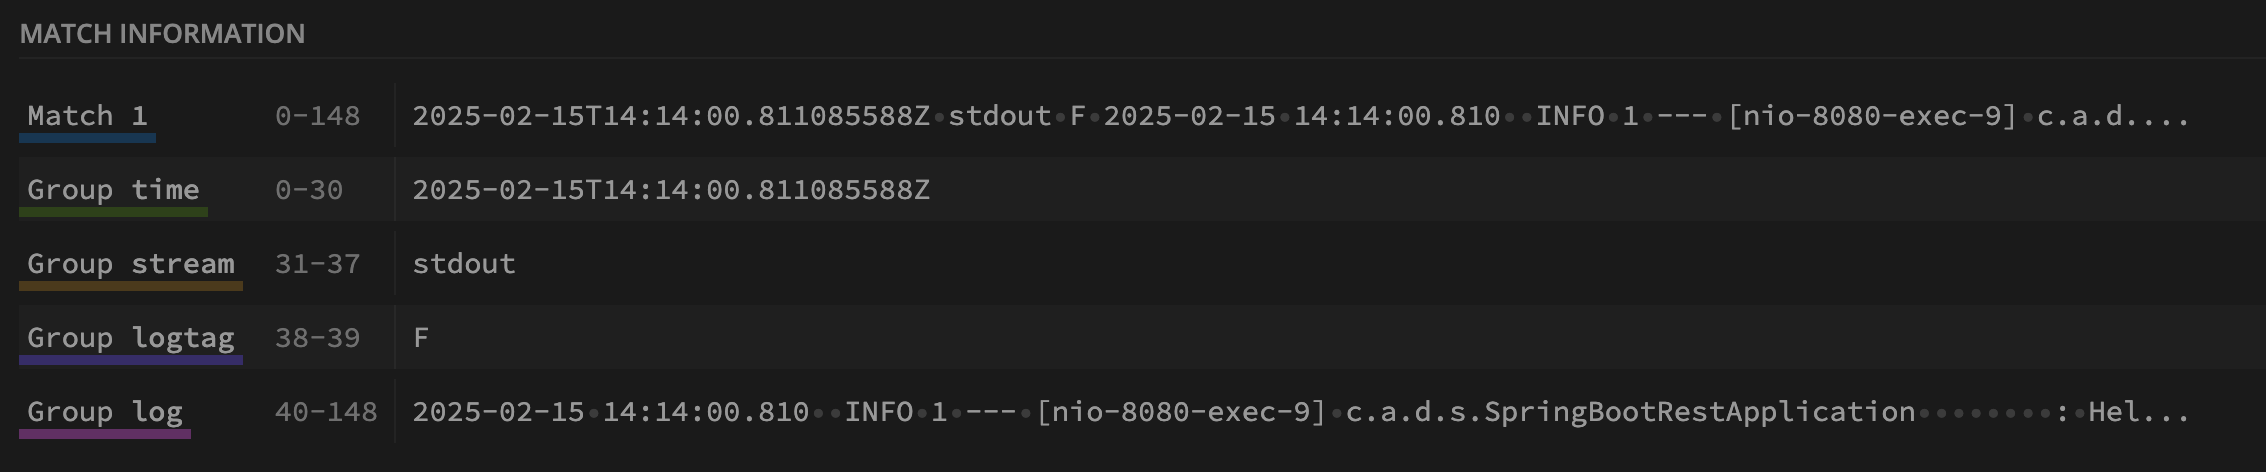
解析结果:
{
  "time": "2025-02-15T14:14:00.811085588Z",
  "stream": "stdout",
  "logtag": "F",
  "log": "2025-02-15 14:14:00.810  INFO 1 --- [nio-8080-exec-9] c.a.d.s.SpringBootRestApplication        : Hello World",
  "log.file.path"": "/var/log/pods/default_java-sample-77b6d8f9c5-5zzh5_e6c5ca2a-6c3f-4ae4-89a6-34ca5cd9a3fa/java-sample/0.log"
}
解析后的日志,输出到下一个处理器 containerd-recombine。
流水线:多行日志合并
第二个处理器 containerd-recombine,用于合并多行日志。通过日志格式类型 logtag 是否为 F 来判断是否是多行日志的最后一行。
- id: containerd-recombine
  type: recombine
  combine_field: attributes.log
  combine_with: ""
  source_identifier: attributes["log.file.path"]
  is_last_entry: attributes.logtag == 'F'
  max_log_size: 0
  output: extract_metadata_from_filepath
这里使用了 recombine 类型的处理器,用于合并多行日志。这里的配置表示:
combine_field:合并后的日志字段名,还是log。combine_with:合并多行日志的分隔符,这里为空。source_identifier:合并多行日志的标识符,这里是日志文件路径。is_last_entry:是否是多行日志的最后一行,这里是判断日志格式类型是否为F。max_log_size:最大日志大小,这里是 0,表示不限制日志大小。output:输出到下一个处理器 extract_metadata_from_filepath。
流水线:提取日志元数据
第三个处理器 extract_metadata_from_filepath,用于提取日志文件路径中的元数据。
- id: extract_metadata_from_filepath
  type: regex_parser
  parse_from: attributes["log.file.path"]
  regex: ^.*\/(?P<namespace>[^_]+)_(?P<pod_name>[^_]+)_(?P<uid>[a-f0-9\-]+)\/(?P<container_name>[^\._]+)\/(?P<restart_count>\d+)\.log$
这里又是 regex_parser 类型的处理器,用于解析日志文件路径。这里的正则表达式将日志文件路径解析为命名空间 namespace、Pod 名 pod_name、Pod UID uid、容器名 container_name、重启次数 restart_count 等元数据。
示例用的日志文件路径 /var/log/pods/default_java-sample-77b6d8f9c5-5zzh5_e6c5ca2a-6c3f-4ae4-89a6-34ca5cd9a3fa/java-sample/0.log,正则的匹配结果。
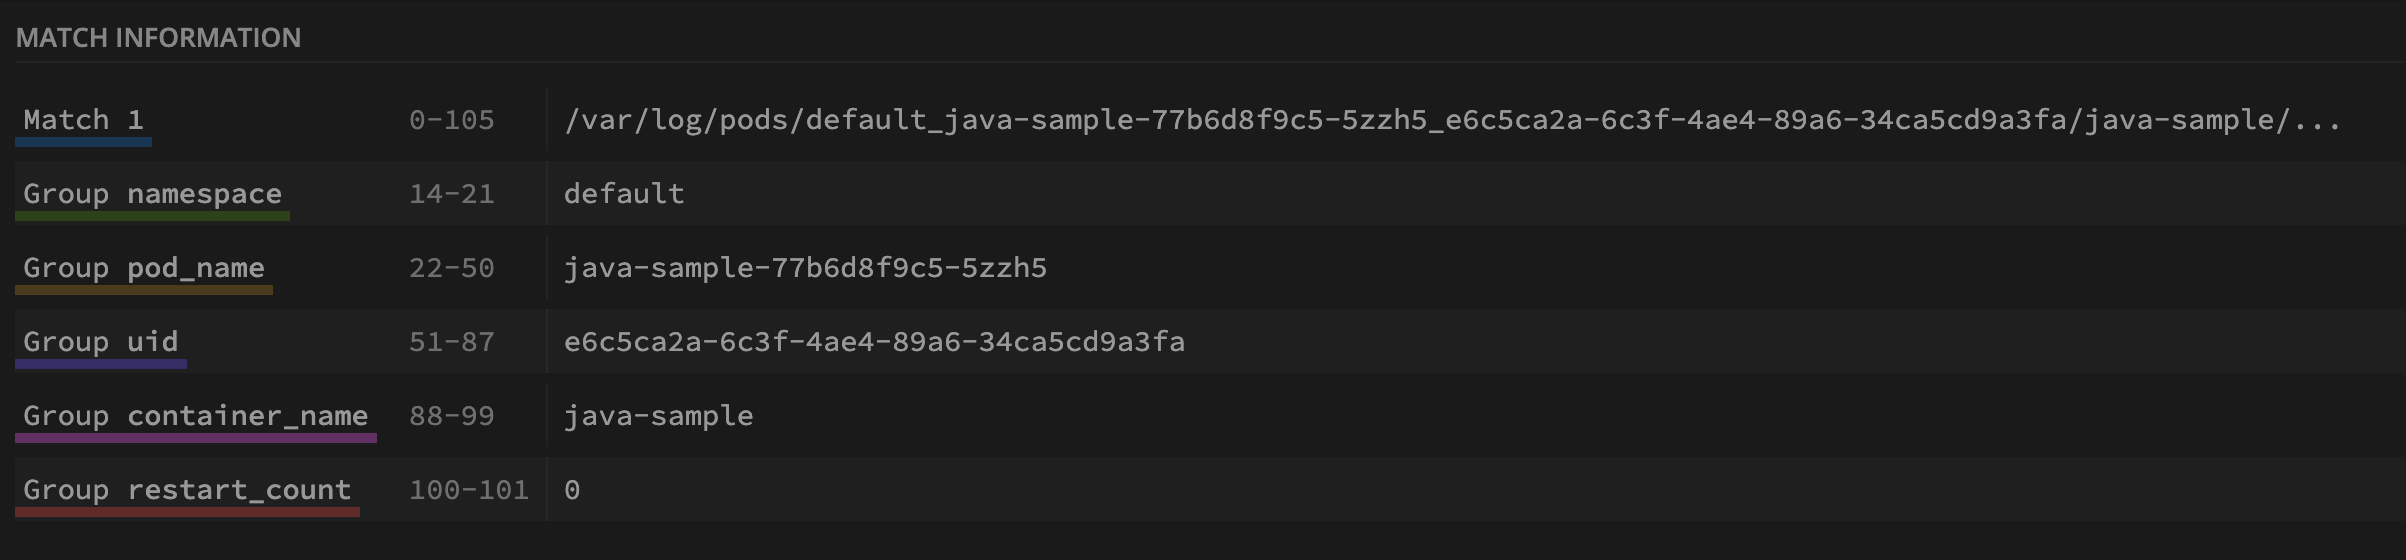
提取到的元数据被合并到原来的日志结构中:
{
  "time": "2025-02-15T14:14:00.811085588Z",
  "stream": "stdout",
  "logtag": "F",
  "log": "2025-02-15 14:14:00.810  INFO 1 --- [nio-8080-exec-9] c.a.d.s.SpringBootRestApplication        : Hello World",
  "log.file.path"": "/var/log/pods/default_java-sample-77b6d8f9c5-5zzh5_e6c5ca2a-6c3f-4ae4-89a6-34ca5cd9a3fa/java-sample/0.log",
  "namespace": "default",
  "pod_name": "java-sample",
  "uid": "77b6d8f9c5-5zzh5",
  "container_name": "java-sample",
  "restart_count": "0"
}
这样,我们就完成了对 Containerd 容器日志的解析和元数据提取。如果我们要将日志输送给 Loki 来存储,还需要对日志做进一步转换成 Loki 的格式:将元数据转换成 Loki 的标签。
因此,我们还需要添加一些处理器,将元数据转换成 Loki 的标签。
流水线:元数据转换
数据的转换需要用到 move 处理器,它可以将一个字段的值移动到另一个字段。
- type: move
  from: attributes.namespace
  to: resource["k8s.namespace.name"]
- type: move
  from: attributes.pod_name
  to: resource["k8s.pod.name"]
- type: move
  from: attributes.uid
  to: resource["k8s.pod.uid"]
- type: move
  from: attributes.container_name
  to: resource["k8s.container.name"]
- type: move
  from: attributes.restart_count
  to: resource["k8s.container.restartCount"]
这里将命名空间 namespace、Pod 名 pod_name、Pod UID uid、容器名 container_name、重启次数 restart_count 等元数据转换成 Loki 的 resource 标签。
根据应用程序日志格式的不同,可能还需要多额外的处理。
流水线:堆栈日志合并
一些应用程序输出多个日志线,实际上是单个日志记录。一个常见的例子就是 Java 堆栈跟踪:
java.lang.Exception: Stack trace
        at java.lang.Thread.dumpStack(Thread.java:1336)
        at Main.demo3(Main.java:15)
        at Main.demo2(Main.java:12)
        at Main.demo1(Main.java:9)
        at Main.demo(Main.java:6)
        at Main.main(Main.java:3)
recombine 处理器又派上用场了。
- type: recombine
  combine_field: body
  is_first_entry: body matches "^[^\\s]"
  source_identifier: attributes["log.file.path"]
这里的配置表示:
combine_field:合并后的日志字段名,还是body。is_first_entry:是否是多行日志的第一行,这里是判断日志是否以非空字符开头。source_identifier:合并多行日志的标识符,这里是日志文件路径。
这样,我们就完成了对容器日志的解析、元数据提取和 Loki 标签转换等一系列操作。
完整配置
最终的完整版配置如下:
config:
  receivers:
    filelog:
      include:
      - "/var/log/pods/*/*/*.log"
      exclude:
      - "/var/log/pods/otel-collector*/*/*.log"
      - "/var/log/pods/loki*/*/*.log"
      start_at: end
      poll_interval: 300ms
      encoding: utf-8
      include_file_name: false
      include_file_path: true
      preserve_trailing_whitespaces: true
      preserve_leading_whitespaces: false
      operators:
        - id: parser-containerd
          type: regex_parser
          regex: ^(?P<time>\S+Z)\s(?P<stream>stdout|stderr)\s(?P<logtag>[^ ]*)\s?(?P<log>.*)
          output: containerd-recombine
        - id: containerd-recombine
          type: recombine
          combine_field: attributes.log
          combine_with: ""
          source_identifier: attributes["log.file.path"]
          is_last_entry: attributes.logtag == 'F'
          max_log_size: 0
          output: extract_metadata_from_filepath
        - id: extract_metadata_from_filepath
          type: regex_parser
          parse_from: attributes["log.file.path"]
          regex: ^.*\/(?P<namespace>[^_]+)_(?P<pod_name>[^_]+)_(?P<uid>[a-f0-9\-]+)\/(?P<container_name>[^\._]+)\/(?P<restart_count>\d+)\.log$
        - type: move
          from: attributes.namespace
          to: resource["k8s.namespace.name"]
        - type: move
          from: attributes.pod_name
          to: resource["k8s.pod.name"]
        - type: move
          from: attributes.uid
          to: resource["k8s.pod.uid"]
        - type: move
          from: attributes.container_name
          to: resource["k8s.container.name"]
        - type: move
          from: attributes.restart_count
          to: resource["k8s.container.restartCount"]
        - type: recombine
          combine_field: body
          is_first_entry: body matches "^[^\\s]"
          source_identifier: attributes["log.file.path"]
实验过程不再赘述,有兴趣的小伙伴可以参考 上篇文章 搭建一套 OpenTelemetry + Loki + Grafana 的环境,然后将上面的配置应用到 Otel Collector。
总结
在本文中,我们深入探索了 OpenTelemetry Collector 的 FileLog 日志接收器的使用。通过配置日志处理流水线,我们可以对容器日志进行解析、元数据提取和 Loki 标签转换等一系列操作,实现了 Container Opeartor 的全部功能。
在掌握了 FileLog 接收器的使用后,我们可以更加灵活地对容器日志进行采集和处理,还能采集和处理如系统日志等其他类型的日志。