云原生 CICD: Tekton Pipeline 实战
更新历史:
Tekton 是 Google 开源的 Kubernetes 原生CI/CD 系统, 功能强大扩展性强. 前身是 Knavite 里的 build-pipeline 项目, 后期孵化成独立的项目. 并成为 CDF 下的四个项目之一, 其他三个分别是 Jenkins, Jenkins X, Spinnaker.
为什么说 Tekton 是 Kubernetes 原生的, 以内其基于 Kubernetes 的 CRD 定义了 Pipeline 流水线.
CRD 及说明:
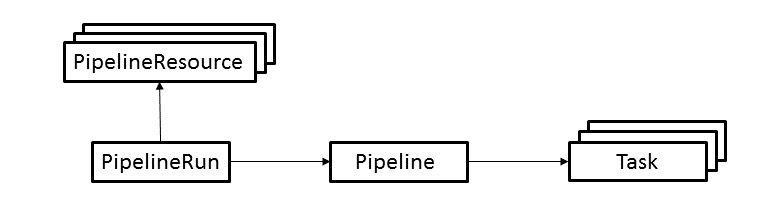
- Task: 构建任务, 可以定义一些列的 steps. 每个 step 由一个 container 执行.
- TaskRun: task 实际的执行, 并提供执行所需的参数. 这个对象创建后, 就会有 pod 被创建.
- Pipeline: 定义一个或者多个 task 的执行, 以及 PipelineResource 和各种定义参数的集合
- PipelineRun: 类似 task 和 taskrun 的关系: 一个定义一个执行. PipelineRun 则是 pipeline 的实际执行. 创建后也会创建 pod 来执行各个 task.
PipelineResource: 流水线的输入资源, 比如 github/gitlab 的源码, 某种存储服务的文件, 或者镜像等. 执行时, 也会作为 pod 的其中一个 container 来运行(比如拉取代码).PipelineResource 目前处于 Alaha,至于原因可以看Why Aren’t PipelineResources in Beta?- Condition: 在 pipeline 的 task 执行时通过添加 condition 来对条件进行评估, 进而判断是否执行 task. 目前是WIP的状态, 待#1137的完成.
组件:
tekton-pipelines-controller: 监控 CRD 对象(TaskRun, PipelineRun)的创建, 为该次执行创建 pod.tekton-pipelines-webhook: 对 apiserver 提供 http 接口做 CRD 对象的校验.
前置条件
文中使用的一些工具,基本都可以通过 homebrew 安装:
- jq :操作 json 的命令行工具
- httpie:HTTP 客户端命令行工具
- minikube 环境
文中的 Java 项目以及 tekton 的相关 yaml 都已经提交到了 tekton-test.
安装
参考上一篇文章, 文章中有个简单的"hello world".
实践
到了这里相信已经安装好了 Tekton. 我们使用Spring Initializer生成的项目为例, 演示如何使用 Tekton 实现 CICD.
开始之前简单整理下这个项目的 CICD 流程:
- 拉取代码
- maven 打包
- 构建镜像并推送
- 部署
注: 所有的操作都是在 tekton-pipelines namespace 下操作
0x00 添加 Dockerfile 和部署用的 yaml
用于构建镜像的Dockerfile
FROM openjdk:8-jdk-alpine

RUN mkdir /app
WORKDIR /app
COPY target/*.jar /app/app.jar
ENTRYPOINT ["sh", "-c", "java -Xmx128m -Xms64m -jar app.jar"]
用于部署 K8s Deployment 的 deployment.yml,同时通过创建 NodePort 类型的 Service 用于访问应用。
apiVersion: "apps/v1"
kind: "Deployment"
metadata:
  labels:
    app: "tekton-test"
  name: "tekton-test"
spec:
  replicas: 1
  selector:
    matchLabels:
      app: "tekton-test"
  template:
    metadata:
      labels:
        app: "tekton-test"
    spec:
      containers:
        - image: "addozhang/tekton-test:latest"
          imagePullPolicy: "Always"
          livenessProbe:
            failureThreshold: 3
            httpGet:
              path: "/actuator/info"
              port: 8080
              scheme: "HTTP"
            initialDelaySeconds: 60
            periodSeconds: 10
            successThreshold: 1
            timeoutSeconds: 10
          name: "tekton-test"
          ports:
            - containerPort: 8080
              name: "http"
              protocol: "TCP"
          readinessProbe:
            failureThreshold: 3
            httpGet:
              path: "/actuator/info"
              port: 8080
              scheme: "HTTP"
            initialDelaySeconds: 30
            periodSeconds: 10
            successThreshold: 1
            timeoutSeconds: 10
---
apiVersion: v1
kind: Service
metadata:
  creationTimestamp: null
  labels:
    app: tekton-test
  name: tekton-test
spec:
  ports:
  - port: 8080
    protocol: TCP
    targetPort: 8080
  selector:
    app: tekton-test
  type: NodePort
0x01 RBAC
创建 ServiceAccount 用于 Pipeline 的运行。
注:这里为了方便,授予了 ClusterRole admin。
# serviceaccount.yaml
apiVersion: v1
kind: ServiceAccount
metadata:
  name: tekton-build

---
apiVersion: rbac.authorization.k8s.io/v1
kind: ClusterRoleBinding
metadata:
  name: pipeline-admin-binding
roleRef:
  apiGroup: rbac.authorization.k8s.io
  kind: ClusterRole
  name: admin # user cluster role admin
subjects:
- kind: ServiceAccount
  name: tekton-build
  namespace: tekton-pipelines
0x02 拉取代码
代码作为构建的输入, 需要提供一个 Pipeline CRD 对象来表示输入是从 git 仓库来获取代码。
访问 Tekton Hub 可以找到现成的 git-clone task。
使用 kubectl 安装:
kubectl apply -f https://raw.githubusercontent.com/tektoncd/catalog/main/task/git-clone/0.4/git-clone.yaml
或者使用 tekton-cli 安装:
tkn hub install task git-clone
0x03 maven 打包
Task source-to-image.yaml的 step maven:
spec:
  workspaces:
    - name: source
  steps:
    - name: maven
      image: maven:3.5.0-jdk-8-alpine
      workingDir: $(workspaces.source.path)
      command:
        - mvn
      args:
        - clean
        - install
        - -DskipTests
      volumeMounts:
        - name: m2
          mountPath: /root/.m2
  volumes:
    - name: m2
      hostPath:
        path: /home/docker/.m2
说明:
有了代码下一步就是执行 maven 的编译打包, 在maven:3.5.0-jdk-8-alpine镜像中执行mvn的相关命令.
这里挂在了一个本地的volume, 避免每次构建重复下载依赖包, 同时里面还有 settings.xml
注意: 对于 minikube, hostPath 请使用/data/.m2, 否则minikube重启后无法持久化
0x04 构建镜像并推送
Task source-to-image.yaml 的 step build-and-push:
spec:
  params:
    - name: pathToDockerFile
      description: The path to the dockerfile to build (relative to the context)
      default: Dockerfile
    - name: imageUrl
      description: Url of image repository
    - name: imageTag
      description: Tag to apply to the built image
      default: latest
  workspaces:
    - name: source
    - name: dockerconfig
      mountPath: /kaniko/.docker # config.json 的挂载目录
  steps:
    - name: build-and-push
      image: gcr.io/kaniko-project/executor:v1.6.0-debug
      command:
        - /kaniko/executor
      args:
        - --dockerfile=$(params.pathToDockerFile)
        - --destination=$(params.imageUrl):$(params.imageTag)
        - --context=$(workspaces.source.path)
说明:
镜像的构建, 我们采用了 kaniko。
镜像仓库我们选择了Docker Hub, 推送的时候需要使用 credentials。
kaniko 需要将 docker config 的文件存在于 /kanika/.docker 目录下。这里的思路是将 docker 的 config.json,以 secret 的方式持久化,在通过先添加 docker-registry类型的 secret,然后通过 workspace 的方式输入到 kaniko 运行环境中。
config.json 里面保存的 json 结构化的数据,为了方便通过 dry run 创建
kubectl create secret docker-registry dockerhub --docker-server=https://index.docker.io/v1/ --docker-username=[USERNAME] --docker-password=[PASSWORD] --dry-run=client -o json | jq -r '.data.".dockerconfigjson"' | base64 -d > /tmp/config.json && kubectl create secret generic docker-config --from-file=/tmp/config.json && rm -f /tmp/config.json
执行:
kubectl apply -f tasks/source-to-image.yaml
0x05 部署
deploy-to-k8s.yaml:
apiVersion: tekton.dev/v1alpha1
kind: Task
metadata:
  name: deploy-to-k8s
spec:
  inputs:
    resources:
      - name: git-source
        type: git
    params:
      - name: pathToYamlFile
        description: The path to the yaml file to deploy within the git source
        default: deployment.yaml
  steps:
    - name: run-kubectl
      image: lachlanevenson/k8s-kubectl
      command: ["kubectl"]
      args:
        - "apply"
        - "-f"
        - "/workspace/git-source/$(inputs.params.pathToYamlFile)"
说明:
- pathToYamlFile: 指定部署应用的 yaml。
执行:
kubectl apply -f tasks/deploy-to-k8s.yaml
0x06 组装流水线
build-pipeline.yaml
apiVersion: tekton.dev/v1beta1
kind: Pipeline
metadata:
  name: build-pipeline
spec:
  params:
    - name: git-url
    - name: git-revision
    - name: pathToContext
      description: The path to the build context, used by Kaniko - within the workspace
      default: .
    - name: imageUrl
      description: Url of image repository
    - name: imageTag
      description: Tag to apply to the built image
  workspaces:
    - name: git-source
    - name: docker-config
  tasks:
    - name: fetch-from-git
      taskRef:
        name: git-clone
      params:
        - name: url
          value: "$(params.git-url)"
        - name: revision
          value: "$(params.git-revision)"
      workspaces:
        - name: output
          workspace: git-source
    - name: source-to-image
      taskRef:
        name: source-to-image
      params:
        - name: imageUrl
          value: "$(params.imageUrl)"
        - name: imageTag
          value: "$(params.imageTag)"
      workspaces:
        - name: source
          workspace: git-source
        - name: dockerconfig
          workspace: docker-config
      runAfter:
        - fetch-from-git
    - name: deploy-to-k8s
      taskRef:
        name: deploy-to-k8s
      params:
        - name: pathToYamlFile
          value: deployment.yaml
      workspaces:
        - name: source
          workspace: git-source
      runAfter:
        - source-to-image
执行:
kubectl apply -f tasks/deploy-to-k8s.yaml
0x07 执行流水线
apiVersion: tekton.dev/v1beta1
kind: PipelineRun
metadata:
  generateName: generic-pr-
  name: generic-pipeline-run
spec:
  pipelineRef:
    name: build-pipeline
  params:
    - name: git-revision
      value: main
    - name: git-url
      value: https://github.com/addozhang/tekton-test.git
    - name: imageUrl
      value: addozhang/tekton-test
    - name: imageTag
      value: latest
  workspaces:
    - name: git-source
      volumeClaimTemplate:
        spec:
          accessModes:
          - ReadWriteOnce
          resources:
            requests:
              storage: 1Gi
    - name: docker-config
      secret:
        secretName: docker-config
  serviceAccountName: tekton-build
执行:
kubectl apply -f run/run.yaml
0x08 结果
执行流水线后, 可以看到分别创建了下面的几个 pod:
- generic-pipeline-run-deploy-to-k8s-xxx
- generic-pipeline-run-fetch-from-git-xxx
- generic-pipeline-run-source-to-image-xxx
以及我们的应用 tekton-test-xxx,发起请求测试:
$ http $(minikube ip):$(kubectl get svc tekton-test -o jsonpath="{.spec.ports[0].nodePort}")/hi --body
hello world
总结
目前 Tekton 进入 beta 阶段, 最新的版本是 0.25.0。基于 CRD 的实现让 Tekton 在实际使用中可以灵活的设计自己的 CICD 流程.
生态也越来越完善,比如 Tekton Hub 提供了大量的可重用最佳实现的 Task 和 Pipeline。
下一篇,我们尝试下如何在 Jenkins 中与 Tekton Pipeline 进行交互。
更多文章: